顯示具有 Spring Boot 標籤的文章。 顯示所有文章

2022年10月31日 星期一

Spring Boot web 專案整合 Listener 使用 Java class


本文簡單介紹一下,在spring boot 中如何使用Listener。

本文使用版本:
spring boot 2.7.5
java 11
window 11
IntelliJ IDEA
Maven

一、建立 Spring Boot web 來測試
參考本文:
Spring Boot web 專案 RestController Annotation


二、pom.xml  的 dependencies 加入 測試類啟動器

<dependency>
            <groupId>org.springframework.boot</groupId>
            <artifactId>spring-boot-starter-web</artifactId>
        </dependency>

三、建立 TestListener 及 ListenerConfig
src\main\java\ (專案package)
路徑如圖1:


四、TestListener 程式內容
本文 TestListener 程式使用簡單寫法。

	package com.example.demo.listener;

	import javax.servlet.ServletContextEvent;
	import javax.servlet.ServletContextListener;

	public class TestListener implements ServletContextListener {
		@Override
		public void contextInitialized(ServletContextEvent sce) {
			System.out.println("Initialized Listener...");
		}

		@Override
		public void contextDestroyed(ServletContextEvent sce) {
			System.out.println("Destroyed Listener...");
		}
	}


五、加入config類

package com.example.demo.config;

	import org.springframework.boot.web.servlet.ServletListenerRegistrationBean;
	import org.springframework.context.annotation.Bean;
	import org.springframework.context.annotation.Configuration;

	import com.example.demo.listener.TestListener;

	@Configuration
	public class ListenerConfig {
		@Bean
		public ServletListenerRegistrationBean getServletListenerRegistrationBean(){
			ServletListenerRegistrationBean bean = new ServletListenerRegistrationBean(new TestListener());
			return bean;
		}
	}


六、啟動 Application
圖2

七、測試 
圖3


本專案下載:


用LINE傳送分享


其它文章

Spring Boot web 專案整合 Listener 使用 annotation


本文簡單介紹一下,在spring boot 中如何使用 Listener。

本文使用版本:
spring boot 2.7.5
java 11
window 11
IntelliJ IDEA
Maven

一、建立 Spring Boot web 來測試
參考本文:
Spring Boot web 專案 RestController Annotation


二、pom.xml  的 dependencies 加入 測試類啟動器

<dependency>
            <groupId>org.springframework.boot</groupId>
            <artifactId>spring-boot-starter-web</artifactId>
        </dependency>

三、建立 TestListener
src\main\java\ (專案package)
路徑如圖1:


四、TestListener 程式內容
本文TestListener 程式使用簡單寫法。
package com.example.demo.listener;

	import javax.servlet.ServletContextEvent;
	import javax.servlet.ServletContextListener;
	import javax.servlet.annotation.WebListener;

	@WebListener
	public class TestListener implements ServletContextListener {
		@Override
		public void contextInitialized(ServletContextEvent sce) {
			System.out.println("Initialized Listener...");
		}

		@Override
		public void contextDestroyed(ServletContextEvent sce) {
			System.out.println("Destroyed Listener...");
		}
	}

五、main 主程試加入  @ServletComponentScan
圖2


六、啟動 Application
圖3

七、測試 
圖4


本專案下載:


用LINE傳送分享


其它文章

Spring Boot web 專案整合 Filter 使用 Java class


本文簡單介紹一下,在spring boot 中如何使用Filter。

本文使用版本:
spring boot 2.7.5
java 11
window 11
IntelliJ IDEA
Maven

一、建立 Spring Boot web 來測試
參考本文:
Spring Boot web 專案 RestController Annotation


二、pom.xml  的 dependencies 加入 測試類啟動器

<dependency>
            <groupId>org.springframework.boot</groupId>
            <artifactId>spring-boot-starter-web</artifactId>
        </dependency>

三、建立 TestFilter 及FilterConfig
src\main\java\ (專案package)
路徑如圖1:


四、TestFilter程式內容
本文TestFilter程式使用簡單寫法。
	package com.example.demo.filter;

	import javax.servlet.*;
	import java.io.IOException;

	public class TestFilter implements Filter {
		@Override
		public void init(FilterConfig filterConfig) throws ServletException {

		}

		@Override
		public void doFilter(ServletRequest servletRequest, ServletResponse servletResponse, FilterChain filterChain)
				throws IOException, ServletException {
			System.out.println("doFilter 開始 ");
			filterChain.doFilter(servletRequest,servletResponse);
			System.out.println("doFilter 結束 ");
		}

		@Override
		public void destroy() {

		}
	}


五、加入config類

package com.example.demo.config;

	import com.example.demo.filter.TestFilter;
	import org.springframework.boot.web.servlet.FilterRegistrationBean;
	import org.springframework.context.annotation.Bean;
	import org.springframework.context.annotation.Configuration;

	@Configuration
	public class FilterConfig {
		@Bean
		public FilterRegistrationBean getFilterRegistrationBean(){
			FilterRegistrationBean bean = new FilterRegistrationBean(new TestFilter());
			//bean.addUrlPatterns("/testFilter");
			bean.addUrlPatterns(new String[]{"*.do","*.jsp"});
			return bean;
		}
	}

六、啟動 Application
圖2


七、測試 http://localhost:8080/testFilter.jsp
圖3


本專案下載:
https://github.com/pclevinblog/SpringBoot/blob/master/spring-boot-web-filter-class-demo.zip


用LINE傳送分享


其它文章

Spring Boot web 專案整合 Filter 使用 annotation


本文簡單介紹一下,在spring boot 中如何使用Filter。

本文使用版本:
spring boot 2.7.5
java 11
window 11
IntelliJ IDEA
Maven

一、建立 Spring Boot web 來測試
參考本文:
Spring Boot web 專案 RestController Annotation


二、pom.xml  的 dependencies 加入 測試類啟動器

<dependency>
            <groupId>org.springframework.boot</groupId>
            <artifactId>spring-boot-starter-web</artifactId>
        </dependency>

三、建立 TestFilter
src\main\java\ (專案package)
路徑如圖1:


四、TestFilter程式內容
本文TestFilter程式使用簡單寫法。

package com.example.demo.filter;

	import javax.servlet.*;
	import javax.servlet.annotation.WebFilter;
	import java.io.IOException;
	//@WebFilter(filterName = "TestFilter",urlPatterns = {"*.jsp","*.do"})
	@WebFilter(filterName = "TestFilter",urlPatterns = "/testFilter")
	public class TestFilter implements Filter {
		@Override
		public void init(FilterConfig filterConfig) throws ServletException {

		}

		@Override
		public void doFilter(ServletRequest servletRequest, ServletResponse servletResponse, FilterChain filterChain)
				throws IOException, ServletException {
			System.out.println("doFilter 開始 ");
			filterChain.doFilter(servletRequest,servletResponse);
			System.out.println("doFilter 結束 ");
		}

		@Override
		public void destroy() {

		}
	}

五、main 主程試加入  @ServletComponentScan
圖2


六、啟動 Application
圖3

七、測試 http://localhost:8080/testFilter
圖4


本專案下載:
https://github.com/pclevinblog/SpringBoot/blob/master/sprint-boot-web-filter-annotation-demo.zip


用LINE傳送分享


其它文章

Spring Boot web 專案整合 Servlet 使用 Java class


本文簡單介紹一下,在spring boot 中如何使用Servlet。

本文使用版本:
spring boot 2.7.5
java 11
window 11
IntelliJ IDEA
Maven

一、建立 Spring Boot web 來測試
參考本文:


二、pom.xml  的 dependencies 加入 測試類啟動器

<dependency>
            <groupId>org.springframework.boot</groupId>
            <artifactId>spring-boot-starter-web</artifactId>
        </dependency>

三、建立 TestServlet
src\main\java\ (專案package)
路徑如圖1:


四、程式內容
本文程式使用簡單寫法。
package com.example.demo.servlet;

	import javax.servlet.ServletException;
	import javax.servlet.http.HttpServlet;
	import javax.servlet.http.HttpServletRequest;
	import javax.servlet.http.HttpServletResponse;
	import java.io.IOException;


	public class TestServlet extends HttpServlet {

		@Override
		protected void doGet(HttpServletRequest req, HttpServletResponse resp) throws ServletException, IOException {
			super.doGet(req, resp);
			System.out.println(".. test servlet.");
		}
	}


五、加入config類
圖2

package com.example.demo.config;

import com.example.demo.servlet.TestServlet;
import org.springframework.boot.web.servlet.ServletRegistrationBean;
import org.springframework.context.annotation.Bean;
import org.springframework.context.annotation.Configuration;

@Configuration
public class ServletConfig {
    @Bean
    public ServletRegistrationBean getServletRegistrationBean(){
        ServletRegistrationBean bean = new ServletRegistrationBean(new TestServlet());
        bean.addUrlMappings("/test2");
        return bean;
    }
}


六、啟動 Application
圖3

七、測試 http://localhost:8080/test
圖4


本專案下載:


用LINE傳送分享


其它文章

Spring Boot web 專案整合 Servlet 使用 WebServlet Annotation


本文簡單介紹一下,在spring boot 中如何使用Servlet。

本文使用版本:
spring boot 2.7.5
java 11
window 11
IntelliJ IDEA
Maven

一、建立 Spring Boot web 來測試
參考本文:
Spring Boot web 專案 RestController Annotation


二、pom.xml  的 dependencies 加入 測試類啟動器

<dependency>
            <groupId>org.springframework.boot</groupId>
            <artifactId>spring-boot-starter-web</artifactId>
        </dependency>

三、建立 TestServlet
src\main\java\ (專案package)
路徑如圖1:


四、程式內容
本文程式使用簡單寫法。


package com.example.demo.servlet;

	import javax.servlet.ServletException;
	import javax.servlet.annotation.WebServlet;
	import javax.servlet.http.HttpServlet;
	import javax.servlet.http.HttpServletRequest;
	import javax.servlet.http.HttpServletResponse;
	import java.io.IOException;

	@WebServlet(name="TestServlet",urlPatterns = "/test")
	public class TestServlet extends HttpServlet {

		@Override
		protected void doGet(HttpServletRequest req, HttpServletResponse resp) throws ServletException, IOException {
			super.doGet(req, resp);
			System.out.println(".. test servlet.");
		}
	}


註: 重點
1、 繼承 extends HttpServlet
2、 覆寫 Override doGet
3、 設定 @WebServlet 
圖2


五、main 主程試加入  @ServletComponentScan
圖3


六、啟動 Application
圖4

七、測試 http://localhost:8080/test
圖5


本專案下載:


用LINE傳送分享


其它文章

Spring Boot web test mockMvc


本文使用版本:
spring boot 2.6.3
java 11
window 11
IntelliJ IDEA
Maven

一、MockMvc 整合測試

Spring Boot 提供的「MockMvc」元件。
它能針對當前專案模擬出發送 HTTP 請求的動作。
跟 Postman 很像。
建立HelloController 來測試
參考本文:


二、pom.xml  的 dependencies 加入 測試類啟動器

<dependency>
            <groupId>org.springframework.boot</groupId>
            <artifactId>spring-boot-starter-test</artifactId>
            <scope>test</scope>
        </dependency>
三、建立 HelloControllerTest
src\test\java\ (專案package)
路徑如圖1:


四、程式內容
本文程式使用簡單寫法。
@RunWith(SpringRunner.class)
@SpringBootTest
public class HelloControllerTest {
private MockMvc mockMvc;
@Before
public void setup(){
mockMvc = MockMvcBuilders.standaloneSetup(new HelloController()).build();
}
@Test
public void testHello() throws Exception {
mockMvc.perform(MockMvcRequestBuilders.get("/test1")).andDo(print());
}
}


類別加上三個標記。
@RunWith 和 @SpringBootTest  是定義測試程式要在 Spring Boot 的環境下執行。
@AutoConfigureMockMvc 代表測試開始時會在元件容器中建立 MockMvc 元件

五、建立 HelloController 測試用的

@RestController
public class HelloController {
@RequestMapping(value = "/test1")
public String test1() {
System.out.println("HelloController -- Spring boot test");
return "Spring boot test";
}
}
六、執行測試結果
點選 HelloControllerTest -> 右鍵 -> Run HelloControllerTest
圖2

圖3 執行中

圖4 執行結果 ,如果打勾綠色的,就是執行成功

圖5 執行結果訊息 主要程式為這行 .andDo(print()) 

圖6 如果執行測試失敗會有紅色的錯誤訊息

本專案下載:


用LINE傳送分享


其它文章

2022年5月22日 星期日

Spring Boot 使用 Actuator 檢查與監控專案-開啟監控功能


上一篇基本的安裝好專案。本來來說明一下相關常用的設定。


一、調整Actuator url path
預設是/actuator , 如果想要調整呢?
設定如下:
management.endpoints.manageweb.base-path=/manage
圖1(都會變成/manage/xxx、可以用來防止被其他人猜到)

圖2 結果

二、開啟所有endpoints(不包含shutdown)
圖3 management.endpoints.web.exposure.include=*


圖4

HTTP方法 Endpoint
GET /actuator
查看有哪些 Actuator endpoint 是開放的
GET /actuator/auditevent
查看 audit 的事件,例如認證進入、訂單失敗,需要搭配 Spring security 使用
GET /actuator/beans
查看運行當下裡面全部的 bean
GET /actuator/conditions
查看自動配置的結果,記錄哪些自動配置條件通過/沒通過
GET /actuator/configprops
查看注入帶有 @ConfigurationProperties 類的 properties 值為何
GET /actuator/env (常用)
查看全部環境屬性,可以看到 SpringBoot 載入了哪些 properties,
(但是會自動*掉帶有 key、password、secret 等關鍵字的 properties 的值,保護安全資訊!)
GET /actuator/flyway
查看 flyway DB 的 migration 資訊
GET /actuator/health (常用)
查看當前 SpringBoot 運行的健康指標
GET /actuator/heapdump
取得 JVM 當下的 heap dump,會下載一個檔案
GET /actuator/info
查看 properties 中 info 開頭的屬性的值
GET /actuator/mappings
查看全部的 endpoint(包含 Actuator 的),以及他們和 Controller 的關係
GET /actuator/metrics
查看有哪些指標
/actuator/metrics/{metric.name}
分別查看各指標的詳細資訊
GET /actuator/scheduledtasks
查看定時任務的資訊


三、指定開啟功能

management.endpoints.web.exposure.include=beans,info
圖5

圖6


四、指定關閉功能

使用 exclude可以用來關閉某些endpoints

management.endpoints.web.exposure.exclude=beans,info
management.endpoints.web.exposure.include=*
圖7

圖8

參考:
https://docs.spring.io/spring-boot/docs/current/actuator-api/htmlsingle/#overview
https://kucw.github.io/blog/2020/7/spring-actuator/


用LINE傳送分享


其它文章

Spring Boot 使用 Actuator 檢查與監控專案


Actuator 是 SpringBoot 提供的監控功能。
可以查看當前 SpringBoot 程式運行狀況,
如自動化配置的資訊、創建的 Spring beans 和獲取當前的 properties 屬性值等。

一、SpringBoot Actuator 的使用
需要加入相關的 maven dependency
https://mvnrepository.com/artifact/org.springframework.boot/spring-boot-starter-actuator/2.6.3
<dependency>
<groupId>org.springframework.boot</groupId>
<artifactId>spring-boot-starter-actuator</artifactId>
</dependency>
圖1


如果你使用:
SpringBoot 開發工具IDEA 及基本專案簡介
https://pclevin.blogspot.com/2022/01/springboot-idea.html

圖2 可以選擇加入Dependencies 


SpringBoot 網路線上建立專案
https://pclevin.blogspot.com/2022/01/spring-spring-initializr-httpsstart.html

圖3


二、啟動後 查看log 
查看LOG後 會看到/actuator
圖4


三、查看actuator網頁, 默認開放可查看的資訊
http://localhost:8080/actuator

圖5
/actuator/health 查看當前 SpringBoot 運行的健康指標


用LINE傳送分享


其它文章

2022年2月12日 星期六

Spring Boot web 專案 Controller RequestBody ResponseBody annotation


@RequestBody annotation 將 HttpRequest Body 映射到domain object,,HttpRequest 主體自動反序列化到 Java 對像上。

@ResponseBody annotation 告訴控制器返回的對象自動序列化為 JSON 並傳回 HttpResponse 對象


一、@RequestBody 及 @ResponseBody 為JSON 資料請求及回應

@RequestBody 及 @ResponseBody 不指定MediaType 預設為 APPLICATION_JSON_VALUE
APPLICATION_JSON_VALUE = application/json
(spring-web-xxx-jar org.springframework.http.MediaType)
程式:
    @RequestMapping(value = "/test1",
            method = RequestMethod.POST)//produces= MediaType.APPLICATION_JSON_VALUE
    public @ResponseBody
    Book bodyTest1(@RequestBody Book book) {
        return book;
    }
圖1 


圖2 Book為 domain object,會將傳入參數映射到Book.java中。


圖3 測試 傳送資料為JSON格式,回應為JSON格式
測試URI:http://localhost:8080/books/test1
測試資料:
{
    "id": 30,
    "name": "java",
    "price": "100"
}


二、@RequestBody 及 @ResponseBody 為 XML 資料請求及回應

@RequestBody 及 @ResponseBody 指定MediaType 為 APPLICATION_XML_VALUE
程式:
@RequestMapping(value = "/test2",
            method = RequestMethod.POST,
            produces=MediaType.APPLICATION_XML_VALUE)
    public @ResponseBody
    Book bodyTest2(@RequestBody Book book) {
        return book;
    }

圖4 


圖5 pom.xml 加入dependency com.fasterxml.jackson.dataformat
<dependency>
            <groupId>com.fasterxml.jackson.dataformat</groupId>
            <artifactId>jackson-dataformat-xml</artifactId>
    </dependency>

參考官方文件

圖6 測試  傳送資料為XML格式,回應為XML格式
<?xml version="1.0" encoding="UTF-8" ?>
<root>
  <id>30</id>
  <name>java</name>
  <price>100</price>
</root>


Convert JSON To XML


用LINE傳送分享


其它文章

Spring Boot web 專案 Controller RequestMapping annotation


一、前言
RequestMapping 是開發專案常用的annotation。可以說必用到的。
這RequestMapping annotation,是用來對應請求的URI來決定要執行哪個方法。
如請求 http://localhost:8080/books 而這/books 就是要執行的方向。
而RequestMapping annotation 就是宣告當請求為/Books時,在這裡執行該程式。
二、基本使用
基本使用@RequestMapping("/books") 。
@RequestMapping("/books") 等於@RequestMapping(value="/books") 也等於 @RequestMapping(path="/books")。
而@RequestMapping("/books") 如果你沒設定參數名稱,Spring自動存入value。
另而查看原碼的value 上方會有@AliasFor的annotation。就是對應該參數方法。
如RequestMapping 有value() 跟 path()。所以這二個功能會是一樣的。
所以在Spring的框架中,有些annotation,都在 @xxxxx(這裡給值,不帶參數名稱)
例:@PathVariable("id")、@GetMapping("/books")等。
三、@RequestMapping 註解有八個屬性
name、value、path、method、consumes、produces、params、headers
name :該RequestMapping 分配一个名稱。

value、path :指定請求的實際地址,指定的地址可以是URI

method :指定請求的method型別, GET、POST、PUT、DELETE等
consumes :指定請求提交內容型別(Content-Type),例如application/json, text/html
produces :指定返回的內容型別,僅當request請求頭中的(Accept)型別中包含該指定型別才返回
params :指定request中必須包含某些參數值是,才讓該方法處理
headers :指定request中必須包含某些指定的header值,才能讓該方法處理請求
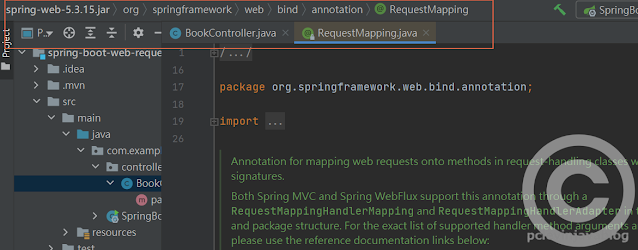
圖1 在spring-web-5.3.15.jar->org->springframework->web->bind->annotation->RequestMapping.java 可以看到相關屬性及說明
本文使用 spring-web-5.3.15.jar ,找spring-web-你的版本的.jar


四、@RequestMapping 註解屬性 value、path 程式測試及說明
本文測試:
BookController 指定為@RequestMapping("/books") ,requestMappingTest1方法指定@RequestMapping("/test1/{id}") 
URI為/books/test1/XXX ->會執行BookController-> requestMappingTest1(id)
程式:圖2 

本文使用工具類:
AnnotationUtils是spring 內鍵的工具類。可以分析Annotation。
import org.springframework.core.annotation.AnnotationUtils;
在測試程式取出RequestMapping Annotation 屬性值,查看value、path值是否相同
測試:圖3 查看value、path值是否相同


五、@RequestMapping 註解屬性 method 程式測試及說明
本文測試: requestMappingTest2 方法上 設定使用 GET 才能通行。
程式:圖4

測試:圖5 使用GET 才能通行。

  圖6 其它不能通行,測試POST 不能通行。
  

六、@RequestMapping 註解屬性 consumes 程式測試及說明
本文測試:requestMappingTest3 方法上 設定使用 POST 才能通行。
且只收JSON格式文件。
consumes 用在將 request Content-Type設定請求的型別。
用法:
consumes = "text/plain"
consumes = {"text/plain", "application/*"}
consumes = MediaType.TEXT_PLAIN_VALUE
程式:圖7 consumes 設為“application/json”型別的請求。

測試:圖8 請求時使用application/json ,結果可以成功回應

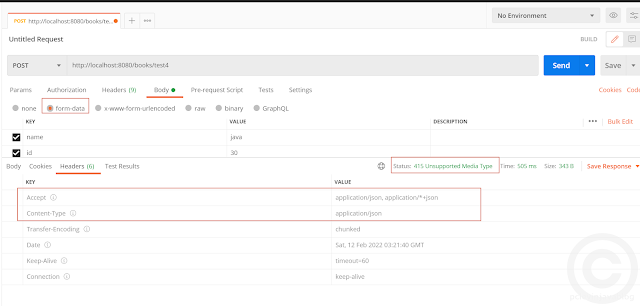
  圖9 請求時使用multipart/form-data ,結果回應415
  

七、@RequestMapping 註解屬性 produces 程式測試及說明
本文測試:requestMappingTest4 方法上 設定使用 POST 才能通行。
且只收JSON格式文件,回應也是JSON格式文件。
produces 設定Headers 裡的Accept屬性(能夠接受的回應內容類型)。
用法:
produces = "text/plain"
produces = {"text/plain", "application/*"}
produces = MediaType.TEXT_PLAIN_VALUE
produces = "text/plain;charset=UTF-8"
程式: produces="application/json;charset=UTF-8" 
application/json  設定接收/回應為JSON格式文件
charset 文件編碼為UTF-8
圖10  

測試:圖11 請求時使用application/json ,結果可以成功回應json

  圖12 查看回傳的Headers 
  

  圖13 請求時使用multipart/form-data ,結果回應415及查看回傳的Headers 
  

八、@RequestMapping 註解屬性 params 程式測試及說明
本文測試: requestMappingTest5  方法上設定GET ,且需要有傳入參數name=java 才能通行。
路徑為"/test5/{id}"
用法: params 是用在限定傳入參數用的,要有該參數及值才會回應請求。
程式:
圖14

測試:
圖15 在請求Params 中帶入name=java。回應成功。

圖16 在請求Params 為空,回應失敗

九、@RequestMapping 註解屬性 headers 程式測試及說明
本文測試:requestMappingTest6 方法上 設定使用 POST 才能通行。
且只收JSON格式文件,回應也是JSON格式文件。
用法:headers 設定,將headers所有的屬型都可設定。
HTTP頭欄位參考
程式:
圖17

測試:圖18 請求時使用application/json ,結果可以成功回應json

  圖19 請求時使用multipart/form-data ,結果回應415及查看回傳的Headers 
  

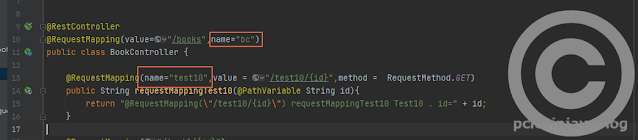
十、@RequestMapping 註解屬性 name 程式測試及說明
本文測試: 將BookController 設name=dc
requestMappingTest10方法 name=test10
用法:@RequestMapping(value="/books",name="bc")
程式:
圖20

測試:需要使用jsp ,spring tags庫mvcUrl函式
圖21 測試jsp

圖22 轉為html頁面的結果

圖23 點入測試url 的測試結果

測試2:如果不設定name時,一樣可以使用tags庫mvcUrl函式取到
而類的name 預設為 類名中的大寫字母
例:Book2Controller 的name = BC
方法的name 就是方法名稱
圖24 如程式預設使用 BC#requestMappingTest10

圖25 測試jsp

圖26 轉為html頁面的結果

圖27 點入測試url 的測試結果


用LINE傳送分享


其它文章

標籤

Oracle (150) Oracle DB (144) Oracle_DB (143) Oracle SQL (135) JAVA (84) css-基本類 (65) MySQL (59) CSS Selector (58) jQuery (49) JavaScript-基本類 (39) Spring Boot (38) JavaScript (37) JavaScript HTML DOM (37) JavaScript-HTML_DOM (36) CSS3 (30) JAVA-基本類 (28) jQuery UI (27) Apache (23) Oracle GROUP BY (20) datepicker (20) Android (18) Oracle Date (17) c (17) JAVA-lang套件 (16) Linux (16) Oracle Sub Query (16) Spring-基本類 (16) jQuery-基本類 (16) MySQL-進階系列教學 (15) Android基本類 (14) Grails (14) Oracle join (14) SQLite (13) Spring (13) WIN7-基本類 (13) grails-基本類 (13) linux cent os (13) CKEditor (12) JAVA-流程控制類 (12) JAVA_Spring (12) PHP (11) Spring MVC (11) MySQL-基本系列教學 (10) Notepad (10) Notepad++ (10) SQLite for java (10) Windows (10) c/c++ (10) eclipse (9) jQuery-Selector (9) sqldeveloper (9) DB_Toad (8) JAVA_IDE_Eclipse (8) JavaScript-String類 (8) MySQL DB Toad (8) MySQL-DATE相關 (8) MySQL-函式相關 (8) Spring Bean (8) Android Studio (7) HTML5 (7) Hibernate (7) JAVA-OCWCD (7) JavaScript-陣列類 (7) Docker (6) JAVA-程式分享 (6) JAVA.util套件 (6) JavaScript-數學類 (6) MinGw (6) MySQL-其它類 (6) Servlet (6) centos (6) Apache_Tomcat (5) Apache套件_POI (5) CSS (5) JavaScript-Date物件 (5) JavaScript-其它類 (5) PostgreSQL (5) httpd (5) log4j (5) 基本資訊 (5) 開發工具 (5) CSS Properties (4) Dev-C++ (4) IntelliJ IDEA (4) Oracle DDL (4) Sublime (4) TortoiseSVN (4) apache_Maven (4) Android NDK (3) Eclipse IDE for C/C++ (3) Hibernate-基本類 (3) JAVA-問題 (3) JAVA-綀習分享 (3) JVM (3) Linux 指令 (3) Proxy Server (3) Spring Mobile (3) Spring web (3) Squid (3) VirtualBox (3) maven (3) zk (3) 生活其它 (3) Bootstrap (2) Filter (2) JAVA_IO (2) JAVA_其它_itext套件 (2) JBoss-問題 (2) JSP (2) Jboss (2) Listener (2) MySQL-語法快速查詢 (2) Spring AOP (2) Spring Batch (2) Spring Boot Actuator (2) Spring i18n (2) Subversive (2) Tomcat 8 (2) UML (2) WebJars (2) WinMerge (2) c++ (2) c語言綀習題 (2) jQuery Mobile (2) jQuery-事件處理 (2) jQuery-套件類 (2) putty (2) svn (2) weblogic (2) Apache_JMeter (1) Apache套件_BeanUtils (1) Apache套件_StringUtils (1) Base64 (1) Google API (1) HTML5-基本類 (1) Heap (1) JAVA 7 (1) JAVA SE 、JAVA EE、JAVA ME (1) JAVA 日期 (1) JAVA-OCJP (1) JAVA-WEB (1) JAVA_IDE (1) JAVA其它 (1) JBoss Server (1) JDK (1) JMX (1) JRE (1) Java RMI (1) Java String (1) Joda Time (1) Linux_其它 (1) MySQL教學 (1) Oracle_VirtualBox (1) SQL Server (1) SWT (1) Session (1) Stack (1) Struts 2 (1) Tool (1) ZK Studio (1) csv (1) grails-其它類 (1) jQuery-進階 (1) java mail (1) java web (1) java8 (1) jsoup (1) mockmvc (1) modules (1) tomcat (1) win10 (1) 其它類 (1) 圖片工具 (1) 模擬器 (1) 讀書分享 (1) 開發資訊 (1)

精選文章

初學 Java 的 HelloWorld 程式

撰寫一個JAVA程式 public class HelloWorld{ public static void main(String[ ] args){ System.out.println("我第一支Java程式!!"); } } ...